Item has been added

Get 20% off!arrow_drop_up

MountGo Car Screen User Guide

Here's a complete guide to setting up your MountGo Car Screen in your car. If you have any questions or if the guides below don't resolve the issue you're experiencing, please contact us at customercare@onetapwireless.com.au.

Last updated: March 2024

Complete Setup Video

1. How to Mount

  • Step 1 : Remove the screen protection and align the 4 tabs of the locking clamp to the rear inserts of the MountGo screen.
  • Step 2 : Push the clips in, hold the MountGo firmly, and slide the locking clamp up to the "CLOSE" position.
  • Step 3 : Adjust the position of the telescoping mount to your preferred angle and place it on your desired mounting spot before taking the adhesive sticker off the telescoping mount.
  • Step 4 : Remove the adhesivesticker and place the device on your desired location. (The screen can still be adjusted later).
  • Step 5 : Lock the telescoping mount in by pulling the tab forward at the base of the mount until it clicks into place (leave for 30 minutes or until secure).
  • Step 6 : Using the dials on the telescoping mount, set the final position of your MountGo.
  • Step 7 : Rotate, pivot or tilt the MountGo while tightening the adjustable locking wheels to secure it in place.

2. How to Power 

  • Step 1 : Plug the 12V auxiliary power cable into a working cigarette lighter input.
  • Step 2 : Insert the opposite end of the cable into the MountGo "DC 12V" input.
  • Step 3 : Your MountGo is now connected to a power source and will automatically turn on when your car's turned on.

If the MountGo is not turning on, please visit a qualified vehicle mechanic to ensure your cigarette lighter input is working and supplying the correct voltage. If you are still experiencing issues, please contact us.

3. How to Connect (Bluetooth Connection)  

  • Step 1 : Turn the MountGo ON and click on the Bluetooth icon on the home page.
  • Step 2 : Go to the Bluetooth settings on your phone and connect to “MOUNTGO7S2”. The MountGo may show up as "CarBt" or "Handsfree".
  • Step 3 : A Bluetooth paring request will come up on your phone screen, click “PAIR”.
  • Step 4 : Once completed, MountGo will connect to your phone via Bluetooth.
  • Step 5 : The option to sync your phone contacts may come up on your phone. You can select "Allow" or "Do not allow" (We recommend syncing your contacts to make it easier to make hands-free calls and messages).
  • Step 5 : Depending on your phone settings, you may receive the option to connect to Apple CarPlay or Android Auto. If you would like to use these options, simply select Use CarPlay or Android Auto.
  • Step 6 : MountGo is now connected to your phone and it will automatically connect to your phone each time you start your car.

4. How to Connect (Apple CarPlay)

If you have completed the steps above and your phone is still not connected to Apple CarPlay please follow the steps below. 

  • Step 1 : On your iPhone, go to Settings   and make sure that Wi-Fi & Bluetooth are turned on. Then go to Settings > General > CarPlay, and select "MOUNTGO7S1/2" or "CarBt"
  • Step 2 : Go to the MountGo home screen section by pressing the Home icon. 
  • Step 3 : Click on the Apple CarPlay icon.
  • Step 4 : Your phone should now be connected to CarPlay. 
  • If your phone is still not connected, please go to step 3 and click "Forget this Car" and start the process again. Please contact us if you are still experiencing issues. 

5. How to Connect (Android Auto) 

  •  Step 1 : If you have an Android device (eg. Samsung, Google Pixel, Huawei) then please download the Android Auto App in the Google Play Store before proceeding with the steps below. 
  • Step 2 : On your phone, navigate to the Bluetooth menu (you can find it in your phone's Settings 
  • Step 3 : Connect to “MOUNTGO7S2”. The MountGo may show up as "CarBt" or "Handsfree"
  • Step 4 : A Bluetooth paring request will come up on your phone screen, click “PAIR”
  • Step 5 : Once completed, the MountGo will be connected to your phone via Bluetooth.
  • Step 6 : An option to sync your contacts may come up on your phone. You can select allow or do not allow (We recommend syncing your contacts to make it easier to make hands-free calls and messages). 
  • To ensure your Android device is compatible with android auto, please check out the minimum requirements here.

6. How to play Audio - (FM Transmission)

  • Step 1 : Go to the MountGo home screen and click on the FM transmission icon.
  • Step 2 : Change the FM radio station of the MountGo using the pre-filled stations and the left and right arrows. We recommend using FM radio stations between 87.5 – 92, 94 – 108 MHz as these are the least used frequencies.
  • Step 3 : Change your car's radio station to match the station on the MountGo. 
  • Step 4 : Press the "ON" selection on the MountGo. The static will stop and the MountGo will connect to your device. Some vehicles have half stations so you will have to tweak the station on your car's radio until the static has stopped. Please note, if the MountGo is not turned on, or the power is disconnected then the connection will not work.
  • Step 5 : Your car will now automatically connect to the MountGo via the selected FM station until it's changed. We also recommend turning the volume back down at the end of a drive to avoid loud static when the car is turned back on.
  • If you would like to play audio through your car's AUX input, make sure the FM transmission is set to "OFF" or the audio will not work.

7. How to play Audio - (AUX)

  • Step 1 : Complete the steps above and ensure your AUX cord is plugged into the MountGo and your vehicles AUX input.
  • Step 2 : Make sure the FM transmission setting is set to "OFF" on the MountGo.
  • Step 3 : Change your car's audio mode to AUX mode (if applicable).
  • Step 4 : The MountGo will automatically connect to your car's factory speakers using the AUX mode and you can now stream music through your car's speakers. Make sure that the MountGo or your phone is not on mute. 

8. How to Use (Dual Bluetooth Connection)

Certain phone/cars support dual Bluetooth connection, which means that the phone's Bluetooth can be connected to the MountGo and the car at the same time. This allowes for a scenario where Apple CarPlay or Android Auto can be used on the MountGo (for navigation, etc.) while streaming Bluetooth audio simultaneously to your car's facotry speakers. 

9. How to Install Reversing Camera

1. Identifying Components
Before you begin, make sure you have the following components with your MountGo HD Back Camera:

  • MountGo Reverse/Back up camera
  • Reverse light power cable
  • 8-meter video signal cable

2. Power Supply Connection
Connect the camera's power cable to the reverse light wiring in your car. This ensures the camera is powered when in reverse.
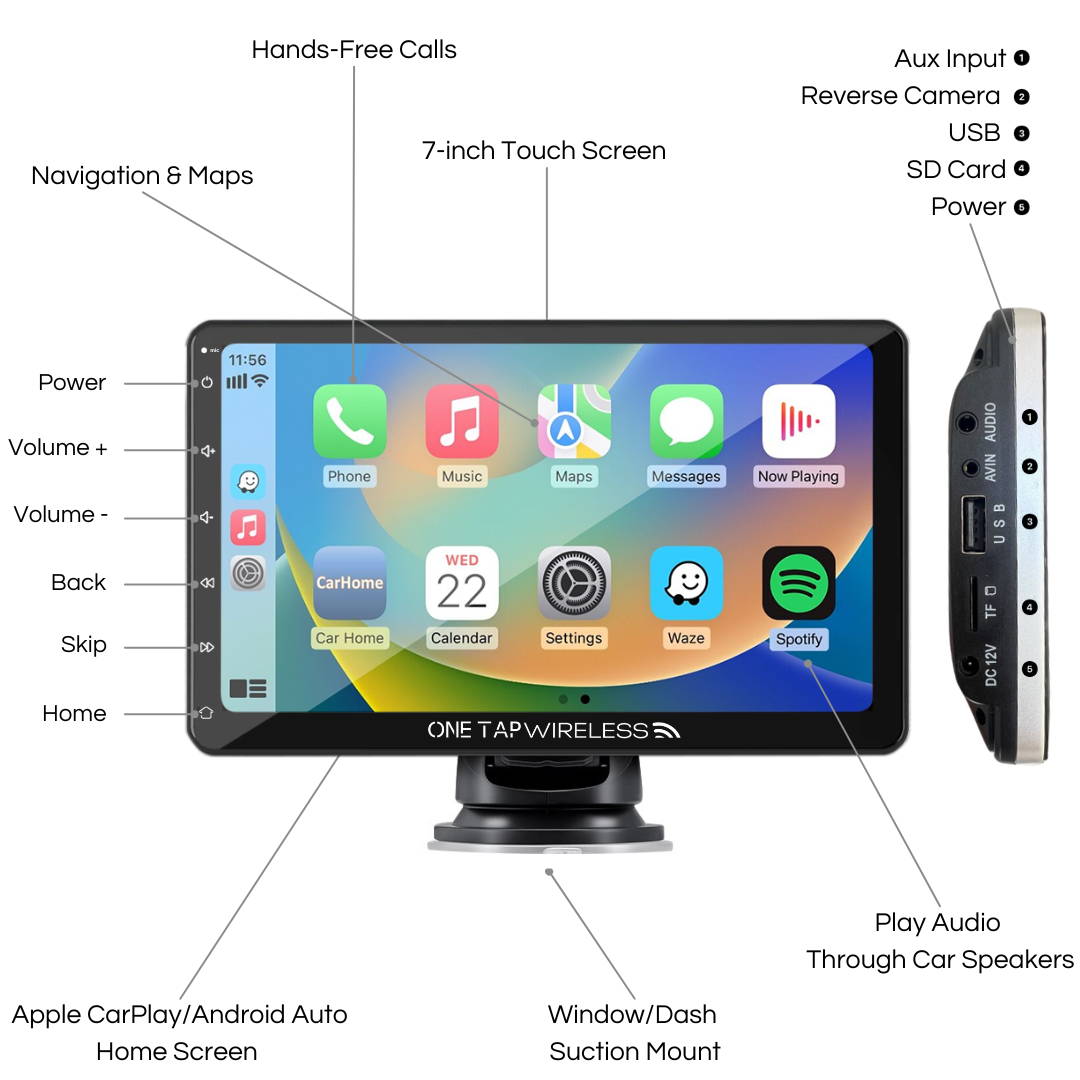
3. Video Signal Connection
Connect the 8-meter video cable from the HD 720 backup camera to the corresponding input on your MountGo Car Screen "AVIN".
4. Testing the System
Start your car and shift into reverse to test the MountGo HD Back Camera:
5. Troubleshooting
If you encounter issues:

  • Double-check all connections.
  • Verify the power supply to the HD 720 Back up camera.
  • Consult user manuals for both the MountGo Car Screen & Back up camera.
  • Contact us at customercare@onetapwireless.com.au for additional support. 

Click here to purchase the MountGo HD Reverse Backup Camera


 Click here to purchase the MountGo Car Screen 

Have questions? 

Let us know!